Table 1.
Let it is necessary to create a query are dividing products into 3 kinds:
	cheap coffee (UnitPrice < 10), road of coffee, cheap tea (UnitPrice < 1) expensive tea and other products.
There are some ways of the decision, but most elegant is to create a field with conditions:

	If ProductName like “ coffee ” and UnitPrice < 10 then CalcField = “Cheap coffee”
	If ProductName like “ coffee ” and UnitPrice >= 10 then CalcField = “Expensive coffee”
	If ProductName like “ Tee ” and UnitPrice < 10 then CalcField = “Cheap Tee”
	If ProductName like “ Tee ” and UnitPrice >= 10 then CalcField = “Expensive Tee”
	Else CalcField = “Other Product”.
The difficulty is, that on creation of a similar design in SQL query some time and, sometimes, essential efforts is required. VSD will allow you to make it much faster.
Picture 2.
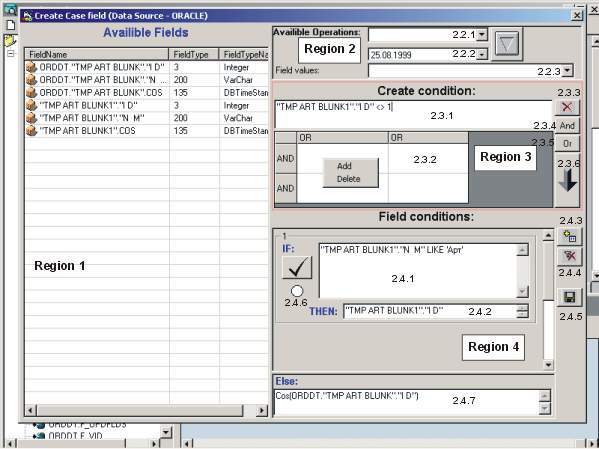
Move the mouse to the table of fields (3) and click the right button. On the appeared menu will choose " Add CalcField ". On the opened form will choose a type of a created field with a condition and press "OK". In the table of fields the new line will appear, at which 9 ("Expression") the column has as against usual fields an emerald background. Move the mouse to there and also press left key. Before you the form (pic.2) - "Creation of fields with conditions" with the following sections will appear:
- "Accessible fields" (Region 1) - list of all fields of the tables in query.
- "Accessible operations, the calendar, values of a field" (Region 2) - will help you to enter from fields with the list the necessary operation (2.2.1), date (2.2.2) and values of a field (2.2.3), previously marked in 2.1.
- Of working area for creation of conditions (Region 3) - two-piece. The first (2.3.1) parts contain directly line of a condition. A part the second (2.3.2) table of the generated conditions divided logic OR or AND by the operators. To add a condition, put with the help of the mouse focus on the necessary cell of the table, press right mouse button and further will choose operation "to add a condition". In the same way it is possible to remove already existing condition from the table. If it is necessary to create a completely new condition in a field 2.3.1 buttons 2.3.3 completely will remove its contents. The buttons 2.3.4 and 2.3.5 add in the table 2.3.2 a line / column. The completely generated condition is added by the button 2.3.6 for the following step of designing (see below).
- Variants of filling of a field (Region 4) - finishing stroke in work on creation of a field with conditions. The button 2.3.6 adds in 2.4.1 the generated condition "IF" (see example). The value of a field at performance of a condition is brought in 2.4.2. The button 2.4.3 adds a new condition IF … THEN … i.e. practically creates one more block (2.4.2 and 2.4.3). The button 2.4.4 deletes a condition IF … THEN … if on it there is a focus. The button 2.4.5 keeps a field with a condition in query, previously having checked up all generated conditions. If any of conditions is incorrect, the semaphore of a field (2.4.6) will have red color. If the design is correct - green.
After creation of a field with conditions, to him is possible to apply the list of operations above fields (sorting, operation of summing).
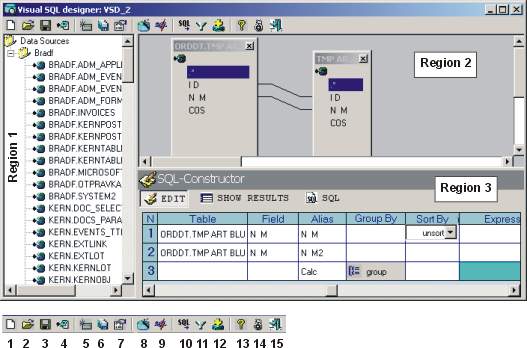
Previously generated query can be looked. For this purpose in the main form (Pic.1) press the button (9). Instead of the table of fields (3) the result of performance SQL will appear.
Picture 3.
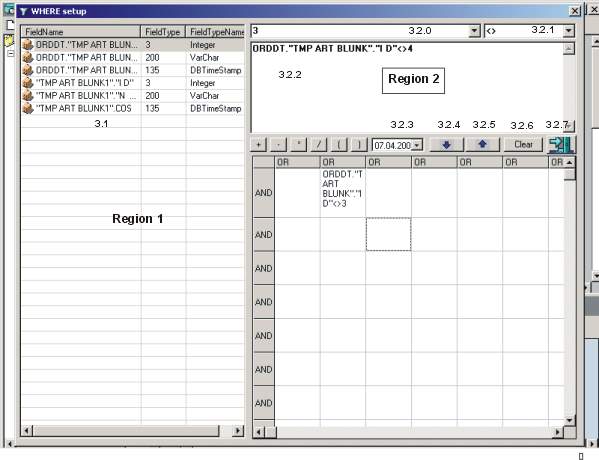
For creation of conditions in query on the main form (Pic.1) press the button (11). The open form (Pic.3) has the title "Make the filter" and contains some areas:
- "Accessible fields" (3.1) - list of all fields of the tables in query.
- "Accessible operations, calendar, the values of a field", working line of input of a condition (Region 2) - will help you to enter from fields with the list the necessary operation (3.2.1), date (3.2.3) and value of a field (3.2.0), previously highlighted in 3.1. The button (3.2.6) clears contents of a working line of input (3.2.2). The buttons with dark blue arrows (3.2.4, 3.2.5) will add with preliminary check the created condition in the table located below on the form. It on structure is identical to the table of fields with conditions considered in the chapter 2 (item 2.3.2). Let's notice, if the condition does not satisfy to rules SQL, it will not be included in the table.
In the main form (Pic.1) press the button (12). In the opened window of dialogue enter a name of representation and press a key "OK".
The note: If you work with RDBMS Access, at preservation of query the representation is created automatically.
In the main form (Pic.1) areas (3) have some bookmarks. To receive the necessary information will choose the necessary bookmark and will click on it the left button of the mouse.
If you want to finish work with the program, in the main form (Pic.1) press the button (15).